
Drawing Lewis Structures Worksheet – A Comprehensive Guide
The world of chemistry can seem daunting, filled with complex formulas and intricate structures. However, understanding the Lewis structure – a visual representation of an atom's bonding – is a fundamental skill for chemists, physicists, and anyone interested in molecular interactions. This article will delve into the intricacies of drawing Lewis Structures, providing a clear and accessible guide to creating and interpreting these essential diagrams. At the heart of this process lies the ability to accurately depict electron distribution, revealing the nature of chemical bonds and predicting the properties of molecules. The 'Drawing Lewis Structures Worksheet' is a powerful tool for both theoretical understanding and practical application. It's more than just a diagram; it's a key to unlocking the secrets of molecular behavior. Let's begin!

Understanding the Basics of Lewis Structures
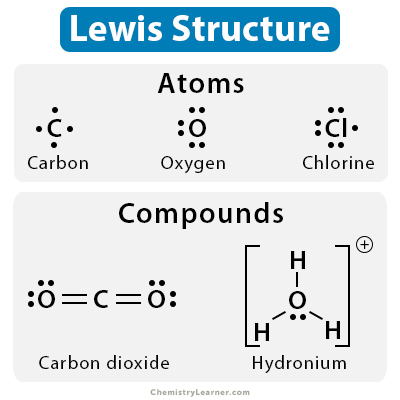
A Lewis structure is a way to represent the bonding arrangement within a molecule. It's a simplified model that focuses on the arrangement of electrons around atoms, showing how they are shared or transferred to form chemical bonds. The core concept is that atoms strive for a stable electron configuration, often resembling a noble gas – having a full outer shell of electrons. This is often represented as a filled octet (eight electrons) or a duet (two electrons) around each atom. The arrangement of these electron pairs dictates the type of bond formed – single, double, or triple. The 'Drawing Lewis Structures Worksheet' provides a structured approach to visualizing these arrangements.

The Basic Components of a Lewis Structure
Before we dive into the specific steps, let's quickly review the key components of a Lewis structure:
- Central Atom: The atom that bears the majority of the bonding electrons.
- Protons: The positively charged particles in the nucleus.
- Electrons: The negatively charged particles orbiting the nucleus.
- Bond Pairs/Lone Pairs: These represent the electrons involved in bonding. Bond pairs are formed between two identical nuclei, while lone pairs are the electrons remaining unbonded from a single nucleus.
- Repetition: Repeating patterns of atoms are crucial for symmetrical molecules.
Creating Your Lewis Structure – A Step-by-Step Guide
Now, let's move on to the practical aspects of drawing a Lewis Structure. It's a process that requires careful observation and attention to detail. Here's a breakdown of the steps involved:
Identify the Central Atom: Begin by identifying the central atom – the atom that will be the focus of the structure. This is the atom that will have the most electrons.

Determine the Number of Protons: Count the number of protons in the central atom. This will determine the number of electrons it needs to gain or lose to achieve a stable electron configuration.
Place the Protons: Place the protons around the central atom, considering the number of protons and the number of electrons needed to achieve a stable octet or duet. Remember, the number of protons determines the number of electrons.
Draw the Electron Pairs: Draw lines connecting the protons to the surrounding atoms to represent the electron pairs. These lines represent the bonding electrons. Pay close attention to the number of electron pairs around each atom.
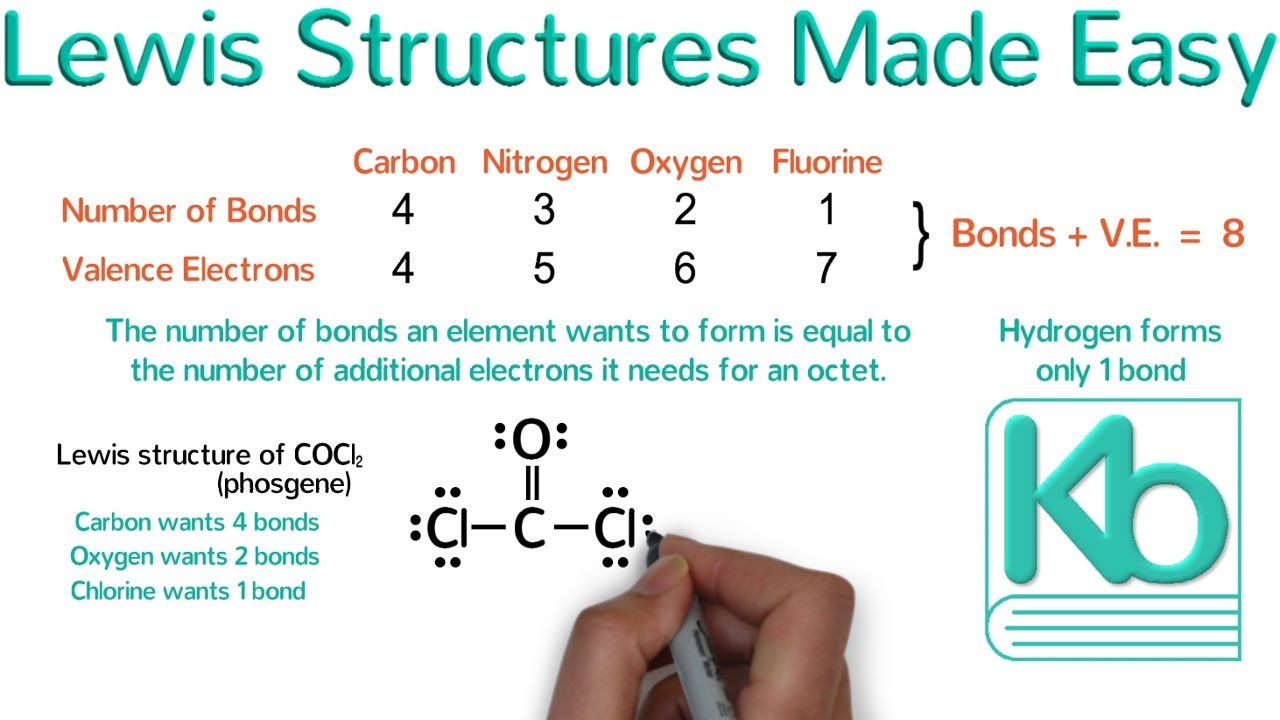
Include Lone Pairs: If an atom has lone pairs of electrons, draw them as well. Lone pairs are often represented by dots or circles.

Represent Symmetry: If the molecule is symmetrical, you can often simplify the structure by drawing it with the same atoms arranged in a regular pattern. Symmetry is a powerful tool for simplifying the structure and reducing the number of lines.

Label the Structure: Clearly label each atom with its name and its position in the structure. This is essential for understanding the molecule.
Lewis Structures for Common Molecules
Let's look at some examples of how to draw Lewis Structures for common molecules:

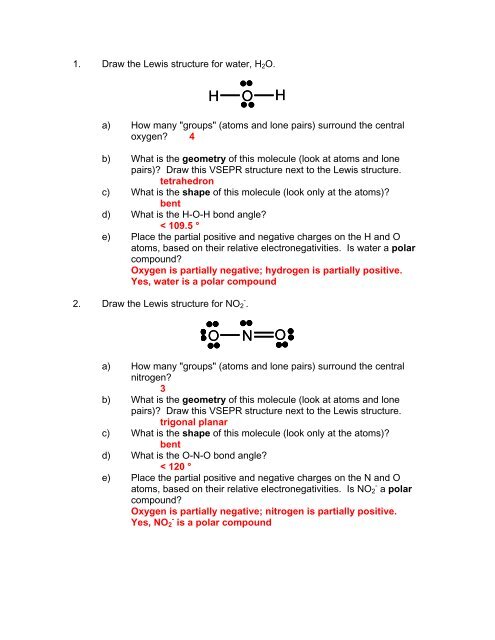
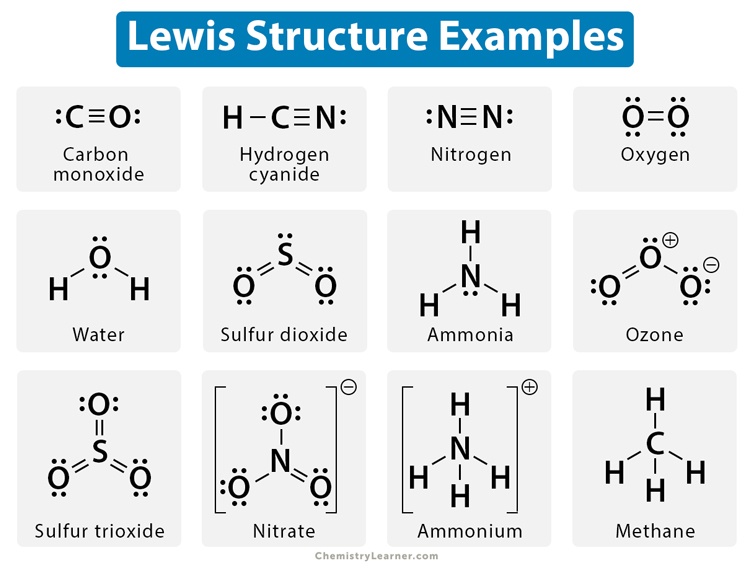
1. Water (H₂O)
- Central Atom: Oxygen (O)
- Protons: 8 (from hydrogen atoms)
- Electron Pairs: Two pairs of electrons are shared between the oxygen and hydrogen atoms.
- Lone Pairs: Each hydrogen atom has one lone pair.

2. Ammonia (NH₃)
- Central Atom: Nitrogen (N)
- Protons: 3 (from three hydrogen atoms)
- Electron Pairs: Three pairs of electrons are shared between the nitrogen and hydrogen atoms.
- Lone Pairs: No lone pairs.


3. Glucose (C₆H₁₂O₆)
- Central Atom: Carbon (C)
- Protons: 6 (from six hydrogen atoms and one oxygen atom)
- Electron Pairs: Six pairs of electrons are shared between the carbon and hydrogen atoms.
- Lone Pairs: No lone pairs.


The Importance of Accurate Representation
The accuracy of a Lewis Structure is paramount. Even small errors in drawing the electron pairs can lead to incorrect predictions about the molecule's properties. It's crucial to pay attention to the number of electrons and the arrangement of electron pairs. Furthermore, the symmetry of the molecule significantly impacts the structure. A symmetrical molecule will often be represented with a simpler, more streamlined structure.

Beyond the Basic Structure – Advanced Concepts
While the basic Lewis Structure provides a solid foundation, there are more advanced concepts to consider:

- Molecular Geometry: The arrangement of atoms in space, determined by the angles between bonds. This is often represented by a 3D model.
- VSEPR Theory: Predicts the shape of molecules based on the repulsion between electron pairs.
- Hybridization: Describes the bonding between atoms in a molecule, particularly in aromatic compounds.
Conclusion – Mastering the Drawing Process
Drawing Lewis Structures is a skill that requires practice and attention to detail. It's a fundamental tool for understanding chemical bonding and predicting molecular properties. By mastering the basic steps and understanding the different types of molecules, you can effectively communicate your understanding of chemical structures and contribute to advancements in chemistry and related fields. The 'Drawing Lewis Structures Worksheet' is a starting point, but continuous practice and exploration of more complex concepts will deepen your knowledge and skills. Remember to always strive for accuracy and clarity in your representations. Further exploration of Lewis structures and related topics will undoubtedly expand your understanding of the fascinating world of molecules.

0 Response to "Drawing Lewis Structures Worksheet"
Posting Komentar